Sunday, October 24, 2010

Crusty Moist Madeleines

These little plumpy morsels in their recognizable shell shape may have originated from France, but its fan base spans the globe. I read that some had said, for the tastiest and most delicately authentic madeleines, one needs to go to France. Hmm...sounds like a darn good idea to me!

The first time I tried making madeleines was well, not quite in their original form as I didn't have any madeleine pans then so I basically used my bear mould pan. I had used the recipe from Lee Mei of Cooking Hut, who shared a classic recipe which uses yeast instead of baking powder.

Last week after purchasing my madeleine pans, I got eager and wanted to make some badly. After searching and comparing about 5-6 recipes (and they all have the same classic ingredients), I stumbled upon one which uses some milk and honey. The result was good if you want crusty edges with a buttery moist inside. These are however, best eaten on the same day they are baked as leaving a day older will have them less spongy.

madeleines
Recipe for "Crusty on the outside, moist in the inside Madeleines" (found at www.epicurious.com)

Ingredients:
1 3/4 sticks (14 tablespoons) unsalted butter, melted and cooled, plus additional for brushing molds
1 2/3 cups all-purpose flour
1 tablespoon baking powder
2 teaspoons finely grated fresh lemon zest
1 vanilla bean, halved lengthwise (or 1 tsp vanilla extract)
3/4 cup sugar
3 large eggs
1/4 cup whole milk
1 1/2 tablespoons mild honey


Method:
Put racks in upper and lower thirds of oven and preheat oven to 350°F. Brush molds with melted butter.
Sift together flour and baking powder into a large bowl, then whisk in zest.
Scrape seeds from vanilla bean into another bowl with tip of a paring knife (reserve pod for another use). Add sugar and rub together until vanilla is well dispersed, then whisk in eggs, milk, honey, and remaining 1 3/4 sticks melted butter. Fold into flour mixture until just combined.
Spoon a rounded tablespoon of batter into each mold, filling it about two-thirds full. Bake (with 2 pans on one rack), switching position of pans halfway through baking and rotating 180 degrees, until golden around edges and a wooden pick or skewer inserted into center of a madeleine comes out clean, 10 to 12 minutes total. (I baked longer for crustier edges)
Turn out madeleines onto a rack and serve slightly warm.
Notes: These madeleines are best eaten when just baked. The batter can be made 3 hours ahead, then chilled, covered.
Cheers
petite nyonya

Tuesday, October 5, 2010

Chef Devagi's South Indian Pepper Chicken


I was delighted to learn that one of Singapore's celebrated chefs, Chef Devagi Sanmugam, recently published her Indian cook book. Titled 'South Indian Temptations', just a quick browse through the pages had me convinced that it is THE South Indian cook book I've been searching for. I've tried only 2 recipes since I purchased the book about 2 months ago and below is one of my 2 tries. Serve it with plain rice or pilaf or biryani rice, this pepper chicken is full of aroma from the lovely blend of spices.

Pepper Chicken (with Coriander!)

1 kg chicken (chopped into small pieces)
3 large tomatoes
2 tbsp black pepper
11 cloves garlic
5 cm piece ginger
2 large onions
1/2 cup water
enough salt
1 tsp turmeric powder
1 tsp chili powder
2 tsps coriander powder
1 tsp black pepper powder
1/2 cup water
10 tbsps oil
2 pieces cinnamon
4 cardamons
4 cloves
1 tsp aniseed (coarsely pounded)
2 sprigs curry leaves

Add in a bunch of chopped fresh coriander leaves in step 3 below. This is my own addition, not stated in Chef Devagi's original version above.


1. Chopped the tomatoes.
2. Blend pepper, garlic, ginger and 1/2 onion with 1/2 cup water in a blender.
3. Mix blended ingredients with enough salt, turmeric powder, pepper powder, chilli powder and coriander powder. Rub over chicken pieces and leave to marinate for 1 hour or more.
4. Add 1/2 cup water and tomatoes to chicken pieces and cook covered over slow heat.
5. When gravy has thickened, turn off the heat.
6. Slice the remaining onion into fine pieces.
7. In a pan, heat oil. Add cinnamon, cardamons, cloves and aniseed. When fragrant, add onion slices and curry leaves.
8. When onions are lightly browned, add chicken pieces and fry for about 5-10 minutes over low heat. Dish out and serve.

Have a great day!

petite nyonya


Monday, September 13, 2010

Apple Butter Cake With Cream Caramel Sauce


There are a couple of good ol' fashion cakes that will never cease on charm and tradition amongst home bakers. Apple butter cake is simply one of them. I don't think anyone who has taken a strong keenness in home baking has not attempted an apple butter cake in his or her baking lifetime, unless of course if you've just only started out in baking. Don't worry, you too will for sure make an apple butter cake someday.
I have a funny relationship with apples. I love the smell of apples when holding one close to my nose. And I like hearing the crunch when someone bites into it. But despite these and its glossy luscious red or fresh vibrant green look, if I could liken eating an apple to a day in a life, it would be an unmistakeably dull, unlikeable day. Somewhat like a much anticipated weekend day at home which turned out unexpectedly unenjoyable, dry and dreadfully slow. One with no phone calls, no messages, no great programs on TV, no pleasant visitors, no sale in the mall, no flowers blooming in the garden, an empty gas tank in the kitchen stove, no eggs in the refrigerator and a visit by the m.i.l. You get the picture.
Apples could be THE most boring fruit to munch on, according to me, for me! But since there is always going to be a better tomorrow (as long as 2012 hasn't arrived! seen the movie?), there's still a hope. If I could pick one out of all types of apples to at least stand out slightly successfully in tackling my munch, it would be the South African variety. It has a nice crunch to it and is sweet, and usually my interest munching it will last a tad bit longer than it usually does with apples before it starts to wane. Therefore, I hardly choose to eat apples.

BUT, give me apples fried, cooked or baked, I'm all for it. In all its forms, commercial glory and varieties, I do appreciate the fact that apples exist! Being one of the most bountiful of fruits, a wide cooking option is available, from apple cake to apple tart to apple pie to apple sauce to apple strudel to all sorts of creative uses in meals. I can't disagree that it is one of the most marvelous fruits to be created, sowed and reaped from the face of this earth! According to Wikipedia, at least 55 million tonnes of apples were grown worldwide in 2005, with a market value of about USD$10 billion. Given 5 years on and with overpopulation, I'm sure cultivation and harvesting have since increased!

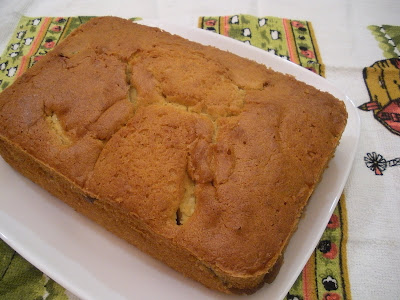
To me, apple cake exudes a feeling evocative of old rustic farmhouse and village charm. I guess I must've gotten this from reading the many blogs that associate apples with autumn pickings, an activity often away from the cities. Thinking of this, I think I would really favor living on a farm. But not in Malaysia though! Anyway, enough rumblings and as you would probably know by now, I simply adore recipes from the Australian Women's Weekly. This apple cake recipe is another awesome one from AWW following the one below on Tiramisu roulade. Topped with cream caramel sauce, this is a winning apple cake recipe!

Recipe:
2 -3 medium green apples
80g butter
3/4 cup (165 g) firmly packed brown sugar
125 g butter, softened, extra
2/3 cup (150 g) caster sugar (I used only 1/2 cup)
1 tsp vanilla extract
2 eggs
1 cup (150 g) self-raising flour
2/3 cup (100 g) plain flour
1/2 tsp bicarbonate of soda
1 cup (250 ml) buttermilk
3/4 cup (180 ml) cream

1. Preheat oven to 180 deg C or 160 deg C with fan-forced. Grease 20cm baking pan.
2. Peel, core and quarter apples; slice thinly. Melt butter in large frying pan; cook apple about 5 minutes or until browned lightly. Add brown sugar; cook, stirring, about 5 minutes or until mixture thickens slightly. Strain apples over medium bowl. Reserve apples and cooking liquid.
3. Beat extra butter, caster sugar and extract in small bowl with electric mixer until light and fluffy. Add eggs, one at a time, beating until just combined between additions; transfer to a large bowl. Stir in sifted dry ingredients and buttermilk, in two batches.
4. Spread two-thirds of the mixture into pan. Top with apples, leaving a 2 cm border around the edge; cover with remaining mixture. (In addition to the pre-cooked apples, I added some chopped fresh green apples into the cake batter as well). Bake about 50 minutes. Stand cake 5 minutes; turn, to-side up, onto wire rack to cool.
5. Meanwhile, return reserved apple liquid to frying pan, add cream; bring to a boil. Reduce heat; simmer, uncovered, about 15 minutes or until sauce thickens (I didn't have anymore cream left so I omitted it, thus my sauce does not look creamy/milky thick).
6. Serve warm cake with caramel sauce.

Click for my previous post on Apple Fritters

Happy baking & best wishes!

Sunday, September 5, 2010

Tiramisu Roulade, Reshaped!


This was supposed to be a roulade, or more commonly known here as swiss roll.

But my rolling technique failed miserably! So, it became a stack tiramisu cake instead. But it tasted just as fantastic as I expected it to be.

Have I mentioned that I'm a HUGE fan of Australian cake recipes and ideas?! ESPECIALLY recipes that are from the Australian Women's Weekly. They are my favorites! So far, all of AWW's cake recipes that I've tried have been accurate and yielded successful results. This 'almost' roulade was no exception.


Back to my failed attempt and the suspected reason for it. I didn't have a proper swiss roll cake pan to begin with, one that is wide or large enough for the batter to spread across more thinly. So, I had no choice but to use my rather small rectangular cookie tray, thinking that 'it'll do it'. Of course it didn't (yes, I'm blaming my pan!) as my cake turned out a tad too thick to be rolled successfully. Thus, it cracked while being rolled. I rolled and unrolled several times and when the cream started to spill out and everything became messy, that's it!! My patience ran thin. In the end, I thought what the heck, all I wanted was to eat this cake regardless what shape it takes. So, I scooped out all the cream again (yes, messy! messy!), cut the cake where it cracked and I got four pieces. I then stacked two pieces, with generous amount of the delicious smooth cream sandwiched in between.

The cake batter is very simple to make and it gives a very airy and light texture. The cream, which combines mascarpone cheese and thickened cream, is infused with coffee flavored liqueur and imparts a lovely aroma and full-bodied creamy taste. This cake makes a superb light but very satisfying dessert after a hearty meal.

I may have failed at my rolling technique but I'm sure you wouldn't. So here goes the recipe for the Australian Women's Weekly's Tiramisu Roulade.

2 tbsps coffee-flavored liqueur (I used Kahlua)
1/4 cup water
2 tbsps caster sugar
1 tbsp instant coffee granules
1 tbsp hot water
3 eggs
1/2 cup caster sugar (extra)
1/2 cup plain flour
2 tbsps flaked almonds

Coffee Liqueur Cream
1 cup mascarpone
1/2 cup thickened cream
2 tbsps coffee-flavored liqueur

1. Grease 25cm x 30cm swiss roll pan; line base and two sides with baking paper, extending paper 5 cm over long sides
2. Combine liqueur with the water and sugar in a small saucepan; bring to boil. Reduce heat; simmer, uncovered, without stirring, for about 5 minutes or until syrup thickens slightly. Remove from heat, stir in half of the coffee; reserve syrup.
3. Dissolve remaining coffee in the hot water.
4. Beat eggs and extra sugar in small bowl with electric mixer about 5 minutes or until sugar is dissolved and mixture is thick; fold in dissolved coffee.
5. Meanwhile, sift flour twice, then sift again over egg mixture and gently fold into mixture. Spread sponge mixture into pan; sprinkle with almonds. Bake about 15-20 minutes or until cake is done at 170 deg C.
6. Meanwhile. place a piece of baking paper cut the same size as the swiss roll pan on working top; sprinkle evenly with about 2 tbsps of caster sugar. Turn sponge onto sugared paper; peel away lining paper. Roll sponge from long side, using paper as guide; cool.
7. Meanwhile, beat ingredients for coffee liqueur cream in a bowl with electric mixer until firm peaks form. Unroll sponge, brush with reserved syrup. Spread cream over sponge then re-roll sponge. Cover roulade with plastic wrap; refrigerate 30 minutes before serving.

Happy rolling!


Tuesday, August 17, 2010

Sambal Telur


There's a very high chance that this is not your first time coming across sambal telur or egg sambal in blogs by Malaysians, or sambal of any kind for that matter. If you're a fellow Malaysian, blogger or not, there's an extremely low probability that you have not cooked sambal before in your very own kitchen, arrrggchoo-ing continuously as you saute that fiery red chili paste in your wok.

The popular base sauce known as 'sambal' has chili as its main ingredient, blended to a smooth paste alongside other condiments like onions, garlic, ginger, turmeric, candlenut and of course, the infamously fragrant Asian shrimp paste or 'belacan'. Different types of sambal may call for the use of different condiments.

Sambal has its roots in Malay cuisine but sambal telur has, over centuries-long of cultural assimilation, become a regular dish in Peranakan or BabaNyonya households.

By its generic name, sambal brings a meaningful form of commonality between the cuisines of Malaysia, Indonesia, Singapore and Brunei. On the other hand, through its varied forms and adaptations, sambal brings uniqueness and identity to each of the said cuisine.

The types of chilies used are usually dried chilies, although there are some recipes that may call for a mixture of dried and fresh chilies, or just fresh chilies alone. Substituting a small amount of the fresh chilies with the bird's eye variety will up the ante for those who have frequently trained and toughened tongue sensory. For the uninitiated, let's just stick to using the less spicy variety of dried or fresh chilies, whichever the recipe calls for.

Once you get a good sambal base, you can switch the eggs with poultry or red meat or seafood, like dried anchovies (ikan bilis), prawns, squids, cockles etc. Sambal is synonymous with nasi lemak (coconut milk rice), one of Malaysia's many signature meals but is also often served as a dish to go with plain rice.


Here's my regular egg sambal recipe the way I've been taught to cook it by my late Mom, who never left my heart nor my thoughts.

Egg Sambal (Serves 3-4)

4 hard boiled eggs
1/4 cup cooking oil
15-20 strips of dried chilies (add more for spicier sambal)
8-10 shallots
3 candlenuts
1.5 tsp belacan (Asian shrimp paste)
1 tbsp tamarind paste, rub/mix in 3/4 cup water
4-5 kaffir leaves
2 large onions, halved then sliced
2 tomatoes, quartered (optional)
2 tsp sugar
1/2 tsp or enough salt for taste

Use a kitchen scissors to cut the dried chilies and remove the seeds inside. Boil in a small pot of water for 5 minutes, then discard the water. Blend the chilies, shallots, candlenuts and shrimp paste. Add 1/4 cup water to ease blending. Heat the cooking oil in a wok/large pan. Saute the blended paste and kaffir leaves together for about 10 -12 minutes over medium heat until the paste is fragrant and is somewhat drier. Add in the tamarind juice, but discard the pulp and seeds. Add in the sliced onions, tomatoes, eggs, sugar and salt . Stir well and let it simmer for a few minutes. It should have a slight hint of sweetness but slightly more sourness. Add enough salt according to personal preference but do note that without enough salt, the sambal will not taste as good. Dish up and serve with rice.


Best

Tuesday, August 10, 2010

Best Banana Muffin With Apricots And Choc Chips

If you love bananas and muffins, this is a recipe you simply must try! It's easy and quick to make, and the taste is totally uncompromised!


By any measure, this is one of the best muffins I've ever made! But then again, I haven't really made THAT many muffins. Whatever it is, seriously, this is a good muffin recipe to share and many people have testified to that. It did not only survive the unforgiving critique of many home cooks but also received glowing reviews from those who tried it. I found this recipe on CatCanCook. The recipe is also included below for a quicker reference.


This is the 2nd time I made this. This time, I gave it a little twist by adding chopped dried apricots and chocolate chips for extra 'dimension'. The base recipe is so good - soft, moist, springy and delicious. What more could you ask for in a muffin?! With a hot cup of coffee or tea, this muffin will just perk up anyone's sulky day.


Recipe (makes 12 delightful muffins)
3-4 large ripe bananas (around 470g)
1/2 cup sugar
1/3 cup butter, melted
1 egg, slightly beaten
1 1/2 cup flour
1 tsp baking powder
1 tsp bicarbonate soda
1/2 tsp salt

Optional: 100g chopped dried apricot and 50g chocolate chips (the combination of dried apricot, chocolate chip and banana go really well together).

Remove the banana skin and mash them. Mix in the sugar, melted butter and egg together with the mashed banana and stir well. Combine in the sifted flour, baking powder, bicarbonate soda, salt, dried apricots and choc chips and mix until just combined. The trick with muffins is to NOT over mix. The batter is supposed to be lumpy and not thoroughly combined like a cake batter. Pour 3/4 full into paper cups placed in muffin pan. Bake at 150 deg C till done.


Best